


Remember when you burned your ear with a curling iron? It’s a right of passage for most women for it’s trilogy of firsts. The first time you thought you could learn everything on YouTube, the first time you get a second degree hair tool burn, and the first time you truly realize how hard it is to curl your hair.
Curling your hair without injury is just one part to a successful experience. Your curls should stay bouncy and in tact for at least 8-10 hours, so technique is key here. Small errors can add up and your hair is pretty unforgiving when it comes to dents and waves.
So, let’s figure this out once and for all. Here’s how to curl your hair the right way.
How to use a curling iron if you are a beginner
There are a few basic steps that will help the process and make your curls last. The clamp in your curling iron is there to give a smoother finish to look compared to a wand. So, take advantage of that and give yourself the smoothest, shiniest most elegant looking curls with the tips below.
Pre-Curling Prep
Most professionals say that the best hair to curl is dirty hair; meaning you want your hair to be at least one day old so that the natural oils create grit to make the style stay. If you wash your hair right before using a curling iron, your hair will likely be too silky, and the style won’t hold.
Washing your hair
When you do wash your hair a day or more before you attempt to curl your hair, the products you use matter. Use a light shampoo and conditioner to ensure that your hair is not weighed down. Conditioner should be applied from the mid-shaft of your hair to the ends and never on the roots. I love using a volumizing shampoo and conditioner for extra bounce.
Blow-dry your hair
While you don’t want to get rid of all of the natural texture of your hair, taking a few minutes to brush out your hair will serve you well in the long run. Starting with straight hair will give you the best results when you use a curling iron.
I like to use the Royal Blowout Heat Styling Spray by Oribe and the 7SECONDS™ Detangler By UNITE HAIR while blow drying my hair for better results.
Related: These Products Will Make Drying Your Hair Less Miserable
Prepping and protecting your hair from heat
This is a non-negotiable and it applies to anytime you use heat on your hair. Using a good heat protectant will reduce damage and allow your hair to remain healthy.
I like using the Eva NYC Mane Magic 10-1 Primer because it provides a ton of benefits including heat protection. The TRESsemmé Keratin Smooth Heat Protect Spray is also great to protect hair and have a shiny finish to your hairstyle.
Part and section your hair
While you part and section your hair you should make sure that it is absolutely dry. Any amount of moisture in your hair will prevent your curls from setting correctly.
We don’t want all that effort to go waste.
It’s best to part your hair into the way that you plan to wear your hair i.e. center part #teamgenz or side part #teammillennial
Curl each section of your hair
Now it is finally time to curl. Start with the bottom layer of hair for your convenience.
Okay this is the most important part. When curling a section, you want to first run the entire length of the hair through the curling iron just to warm up and get going, it is a little like working out.
Then you actually want to place your clamp at the middle of your hair strand and curl upwards. I know – shocking right? You want to do this for a few seconds, before slowly loosening the clamp and allowing the barrel to fall lower on to the strand. Do this in sections until you get to the end of the strand.
The only way to do this is to feed your hair through the curling iron by lifting the clamp a little at a time to let hair through. This technique ensures that the heat is distributed evenly throughout the hair creating a better curl.
If you spend 12 seconds on the entire piece of hair, imagine holding each section for 3 seconds.
And then remember how when you work out you need to cool down? It’s the same with your hair. Let the curls cool completely before you do anything to them.

Few things to note. It is important to use the same angle while curling all of your hair for even curls. The position that you hold your iron actually reflects the outcome of the curl.
So if you commit to holding your iron vertically don’t give up when your arms give out! If you curl some pieces with iron positioned in the horizontal and some pieces in the vertical position your curls will be uneven!
Finish the curled look
Adding a light hold hairspray is good way to finish the look. It will keep the curls in place while allowing for bounce and movement.
Something like the Dry Texturizing Spray by Oribe (a personal favorite) will add volume and hold to your curled hair.
Related: Babyliss Nano Curling Review
Things you should know before using a curling iron
Learning how to perfectly curl your hair with a curling iron takes practice but there a few things you need to know before you even get there.
You are going to have to determine your hair type and make the best choices to attain great results. Here is a basic guide to help you.
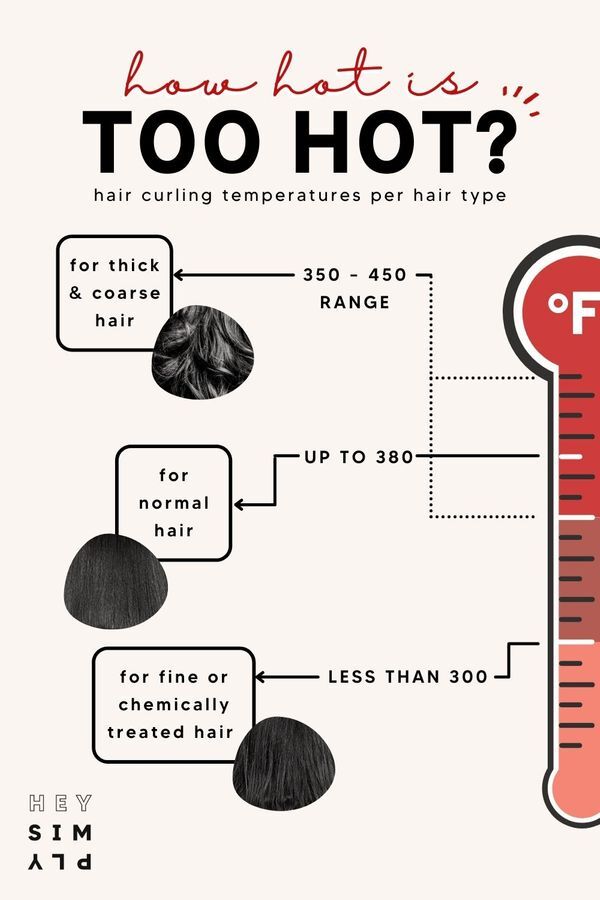
What is the best temperature to curl your hair?
For fine or chemically treated hair you want to keep the heat low because your hair is prone to breakage and can easily be damaged further. It is important to remember that more heat does not equal better curl so even if you have healthy hair you should not exceed 380˚F. However, if you have coarse and thick hair you can use up to 450˚F safely.
Biggest curling iron mistakes you should avoid
We are all bound to make mistakes, but somehow when it comes to curling your hair – getting it wrong is so much easier than getting it right. Like with all things, practice is key here so check and make sure you aren’t making any of these common mistakes.
Curling your hair in the right direction
Hair that surrounds your face needs special attention. Always remember to curl away from the face and towards the hairline.
You want your hair to frame your face and not cover it up. When the hair is curled away it opens up and gently frames your features.
If you want more “piecy” hair like beach waves, curl your hair in different directions so that the curls don’t combine throughout the day. For the wavy look be sure to hold the end out to ensure that your hair doesn’t form full spirals. If you want your hair more smooth like hollywood waves, curl your hair in the same direction across your head.
Curling too much hair at once
I know it is exhausting to style your own hair. but taking big chunks of hair in the curler is not the answer.
The curler needs to be able to heat up the entirety of the hair being curled. The only way to ensure this is to take small chunks of hair at a time. I usually recommend 1-2 inches of hair depending on how much of it your have.
Patience is key. Plus think the arm workout!
Keeping your hair in the iron for too long

You don’t want to overheat any particular spot in your hair and cause damage or breakage. I know it feels like a good idea to keep the hair in the curling iron longer, but it isn’t.
Not letting the curls set
The most important thing to ensure long lasting curls is to allow them to cool in their shape! As tempted as you are, do not run your fingers through your curled hair before it is fully cooled. The curl will lose its structure and well, fall flat.
If you want a tighter curl that’s bound to last (think special event hair) you can set your curls another way. Pinning your curls onto your scalp as soon as they are released from the curling iron is a great way to ensure your curls set. Using double pronged silver clips is the best way to do this.
Gather your curl from the bottom up keeping it in the spiral and pin it in place. Once you’ve all of your hair and it is cooled you can unpin for beautiful voluminous curls.
Related: My Holy Grail Hair Products that You Must Try
How to buy the perfect curling iron
You have to take a few things into account before purchasing the perfect curling iron to suit your needs. Your hair texture, hair length, desired look all plays a role in this decision.
One universal feature that should be in everyone’s curling iron is variable heat settings that can be adjusted based on your needs.
Choose the right material
Different materials conduct heat differently and provide different results on the hair. Choosing the right product will make a difference on how the end result looks and how your hair responds to it over time.
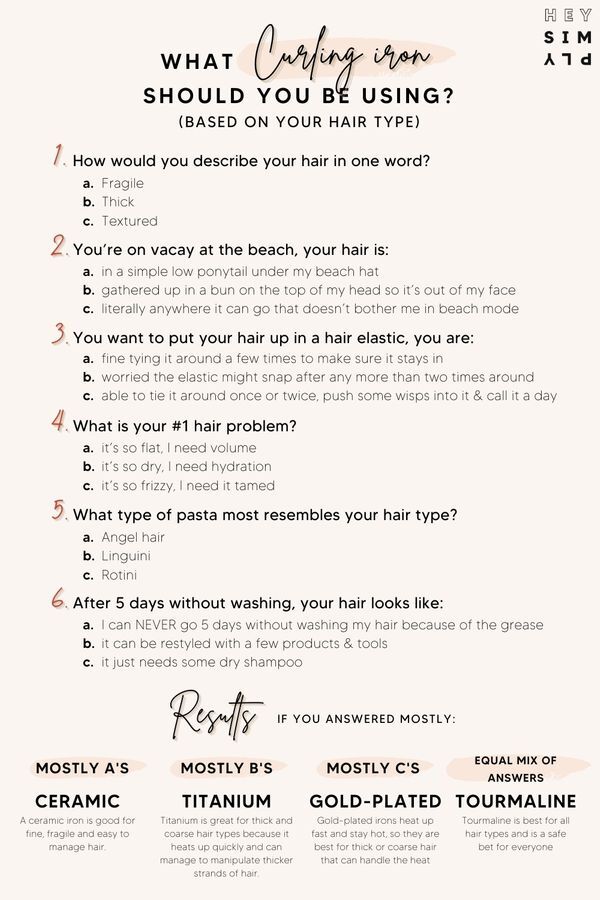
Ceramic curling iron
Using a ceramic iron is good for fine, fragile and easy to manage hair. It works great on both wavy and curly hair because ceramic minimizes frizz and static.
This Harry Josh Pro-Tools 3-in-1 Ceramic curling iron is a great choice.
Titanium curling iron
Titanium is great for thick and coarse hair types because it heats up quickly and can manage to manipulate thicker strands of hair.
It also helps retain moisture in hair which is great for curly and wavy hair type as well.
This Revlon Curling Iron won’t break the bank, if you’re looking for a titanium option.
Tourmaline curling iron
Tourmaline is a great option for all hair types is protects hair cuticles and locks the hair moisture. However, it can wear out faster than the other materials causing need for replacement more often.
Check out Conair’s Infiniti Pro Nano Curling Irons.
Gold Plated Curling Iron
The gold plating is great if you have textured hair. It heats up very quickly and has the ability to calm textured hair.
However, we don’t recommend gold plated curling irons for everyone because of the uneven distribution of heat. It could really damage delicate hair.
If you think it will work for you, we recommend the the Hot Tools 24K Gold Curling Iron.
Choose the right barrel size
The right barrel size for you depends on your hair length and the look you want to achieve.
3/4 inch Barrel curling iron
Anything less than an inch in diameter is great to create ringlets and tight curl on any hair length.
A ¾ inch barrel is ideal for someone with long pixie cut or a bob.
1 inch barrel curling iron
If you don’t know where to start, start here. A one-inch curling barrel is great for someone that is starting out or doesn’t use a curling iron often. With a barrel this size you can easily achieve a variety of looks.
1 1/2 inch barrel curling iron
If you have long hair and/or you want that beachy waves look, you want a 1 ½ inch barrel curling iron in your arsenal.
Oh, and a 1 ½ inch barrel is also perfect to fake a blowout. It you are looking for a sleek look with very slight waves and volume, this is how you do it.
Related: Gym-proof your hair with this easy hack
Final thoughts on how to use a curling iron
Learning how to use curling irons is a great skill to have. You can create so many looks with just one tool, and for added “funsies” you’ll now be the dedicated hair stylist for all of your family functions!
Curling irons can be a safety hazard when not used correctly, so take some time out of your most formidable years to practice this lifelong skill. You spent years on fractions right? At least you’ll actually use this skill!